Most popular

วันอังคารที่ 26 กรกฎาคม พ.ศ. 2554

C# Generic กำหนดเงื่อนไขให้รับ Type ที่ Implement มาจาก Interface

Generic Type นอกจาก Type ทั่วๆไปอย่าง string , int , double และอื่นๆที่เป็นของ C# แล้ว เรายังสามารถกำหนด Type ให้เป็น Class ที่ Implement มาจาก Interface ที่ระบุใน Generic ด้วย

ภาพรวมของคำสั่งทั้งหมด จะประกอบด้วยคลาส Generic และ Interface และ Class ที่ Implement มาจาก Interface

ภายใน Interface IPerson เป็นเพียงการประกาศ method printTpListBox เพื่อให้ Class อื่นๆนำไป Implement ต่อ


    interface IPerson
    {
        void printToListBox(ListBox listbox);
    }


Class ที่นำ IPerson ไป Implement ต่อคือ Class Person ที่การทำงานคือการเก็บค่าของบุคคล โดยมี Property Fname (string) , Lname (string) , Age (int) และ Position (string) และได้ Implement method printToListBox จาก IPerson


    public class Person : IPerson
    {
        string fname;


        public string Fname
        {
            get { return fname; }
            set { fname = value; }
        }
        string lName;


        public string LName
        {
            get { return lName; }
            set { lName = value; }
        }
        int age;


        public int Age
        {
            get { return age; }
            set { age = value; }
        }
        string position;


        public string Position
        {
            get { return position; }
            set { position = value; }
        }


        //Constructor ที่ผ่านค่า Parameter มาให้ Property
        public Person(string firstName, string lastName, int age, string position)
        {
            this.fname = firstName;
            this.lName = lastName;
            this.age = age;
            this.position = position;
        }


        //แสดงข้อมูลบุคคลใน ListBox
        public void printToListBox(ListBox listbox)
        {
            listbox.Items.Add(this.fname + "  " + this.lName + " อายุ " + this.age + " ตำแหน่ง " + this.position);
        }
    }


ต่อมาคือ Class Generic ที่กำหนดเงื่อนไขให้รับ Type เป็น Instance ใดๆที่มาจาก Class ที่ Implement มาจาก IPerson โดยที่กำหนด Key word "where" ต่อท้าย Class


    class personCollection<T> where T : IPerson
    {
        //สร้าง Collection Queue ที่ทำงานแบบ FIFO
        Queue<T> personCol = new Queue<T>();


        //method เพิ่มข้อมูล
        public void Add(T item)
        {
            personCol.Enqueue(item);
        }

        //แสดงข้อมูลผ่าน ListBox
        public void print(ListBox listbox)
        {
            while (personCol.Count > 0)
            {
                T ps = personCol.Dequeue();
                ps.printToListBox(listbox);
            }
        }
    }


การเรียกใช้งานก็เหมือนกับการใช้ Generic Type แต่เปลี่ยนจากการกำหนดชนิดข้อมูลเดิมเป็น Class ที่ Implement มาจาก Interface


    public partial class Form2 : Form
    {
        public Form2()
        {
            InitializeComponent();


            //สร้าง Instance จาก Class Person
            Person p1 = new Person("Keattipoom", "Yamyim", 23, "Sale Manager");
            Person p2 = new Person("Keatkamon", "Kunsopit", 29, "Senior Programmer");


            //สร้าง Generic plist ขึ้นใช้งาน โดยกำหนด Type เป็น Person
            personCollection<Person> plist = new personCollection<Person>();
            //เพิ่ม Instance ของ Class Person ที่มีข้อมูลอยู่แล้ว
            plist.Add(p1);
            plist.Add(p2);
            //ให้ Generic plist แสดงค่าที่ได้รับออกมาทาง ListBox
            plist.print(this.listBox1);
        }
    }


เมื่อรันโปรแกรม ข้อมูลจะถูกแสดงใน ListBox

วันอาทิตย์ที่ 24 กรกฎาคม พ.ศ. 2554

การสร้าง Generic Type ขึ้นใช้งานใน C#

Generic Type เป็นการทำงานแบบ Type safe ที่กำหนดไว้ตั้งแต่แรก ช่วยลดความผิดพลาดจากการทำ Unboxing ที่เกิดควาผิดพลาดได้บ่อยในตอนที่เรานำค่ามาใช้งาน แตกต่างกับการสร้าง Generic Type ที่จะกำหนด Type ข้อมูลตั้งแต่เริ่มแรกเพื่อให้รับข้อมูลตรงตาม Type ที่กำหนดไว้

หมายเหตุ
          ตัวอย่างการทำ Unboxing
          double a = 1.5;
          int b = (int)a;

ผู้เขียนจะแสดงตัวอย่างการใช้ Generic Type ที่สร้างขึ้น เพิ่มข้อมูลแบบ string และ int ใน ListBox

ในหน้า Design วาง ListBox เพียงตัวเดียว
สร้าง Generic Class ชื่อ myList เพื่อเก็บข้อมูล และแสดงข้อมูลทาง ListBox

    public class myList<T>
    {
        //สร้าง Collection List ที่เป็น Generic เพื่อเก็บข้อมูล
        private List<T> localList=new List<T>();

        //method Add รับค่า item ตาม Type ที่กำหนด
        public void Add(T item)
        {
            localList.Add(item);
        }

        //method สำหรับวนลูปแสดงค่าทาง ListBox
        public void printTo(ListBox listBox)
        {
            //เก็บค่า Type ที่ส่งเข้ามา
            Type itmType = typeof(T);
            foreach (T item in localList)
            {
                //ตรวจสอบว่าเป็น Type int หรือไม่
                if (itmType == typeof(int))
                {
                    //ถ้าเป็น Type int ให้นำค่ามาคูณ 2 
                    listBox.Items.Add(Convert.ToInt32(item) * 2);
                }
                else
                {
                    listBox.Items.Add(item);
                }
            }
        }
    }

ผู้เขียนได้เขียนคำสั่งการใช้งาน Generic ที่ Constructor ของฟอร์ม

    public partial class Form1 : Form
    {
        //ประกาศ Instance ของ myList 2 ตัว
        private myList<string> list1;
        private myList<int> list2;
        //ประกาศชื่อคนที่ต้องการทดสอบไว้ใน array
        private string[] friends = {"ศศิชา","วิชัย","ทิพภา","อภัสรา","พุทธชาด","ไชยา","กฤตธานนท์","จิรายุทธ์" };

        //Constructor ของฟอร์ม
        public Form1()
        {
            InitializeComponent();
            //สร้าง Generic Object ให้รับค่า string
            this.list1 = new myList<string>();
            //วนลูปชื่อคนใส่ใน Generic Object
            foreach (string item in friends)
                this.list1.Add(item);

            //ใช้ method แสดงข้อมูลทาง ListBox
            this.list1.printTo(this.listBox1);

            //สร้าง Generic Object ให้รับค่า int
            this.list2 = new myList<int>();
            //วนลูปชื่อคนใส่ใน Generic Object
            for (int i = 0; i < 20; i++)
                this.list2.Add(i);

            //ใช้ method แสดงข้อมูลทาง ListBox
            this.list2.printTo(this.listBox1);
        }
    }

ภาพรวมของ Generic Class และฟอร์ม ที่สร้างขึ้น


เมื่อรันโปรแกรม Generic ที่สร้างขึ้นจะทำงานได้ผลดังภาพ


เริ่มต้นสร้าง Custom Control ใน .Net C# ตอนที่ 2

จากตอนที่แล้ว (http://systemdevman.blogspot.com/2011/07/customize-control-net-c-1.html) ผู้เขียนได้แสดงการสร้าง Custom Control ที่ทำการ Inheritance (สืบทอด) มาจาก Control ต้นแบบคือ Button (ปุ่มกด)
ในตอนที่ 2 นี้ผู้เขียนจะแสดงการสืบทอดจาก Control DataGridView ทำให้เป็น Grid สำเร็จรูปเพื่อแสดงชุดข้อมูลที่ต้องการ เพื่อให้ท่านผู้อ่านได้เข้าใจในแนวคิดการสร้าง Custom Control เพื่อประยุคใช้งานมากขึ้น

เพิ่มไฟล์ Custom Control เข้ามาใน Project

ในที่นี้ผู้เขียนตั้งชื่อไฟล์เป็น myGridView.cs
ในไฟล์จะได้คลาสเริ่มต้นที่สืบทอดมาจาก Control เหมือนเดิม
ผู้เขียนจะเปลี่ยนให้สืบทอดมาจาก DataGridView แทน
โดยในตัวอย่างนี้จะทำให้ DataGridView มีการเลือก Column Set ที่กำหนดไว้ให้ใช้งานอยู่แล้ว ประกอบด้วย กลุ่มข้อมูลสินค้า , กลุ่มข้อมูลพนักงาน และกลุ่มข้อมูลจังหวัด

คำสั่งทั้งหมดมีดังนี้
    //สร้างประเภทของข้อมูล

    public enum ColumnSet { Employee, Product, Province };
    //คลาส myGridView ที่สืบทอดมาจาก Control DataGridView
    public partial class myGridView : DataGridView
    {
        //ประกาศตัวแปร selectColSet ให้เก็บค่าชนิด ColumnSet ที่สร้างไว้
        private ColumnSet selectColSet;


        //เพิ่มคำอธิบาย Property
        [Description("เลือกกลุ่มข้อมูล")]
        //ใช้การ Encapsulation สร้าง Property SelectColSet เพื่อให้เข้าถึงค่าของ selectColSet จากภายนอก
        public ColumnSet SelectColSet
        {
            get { return selectColSet; }
            set { selectColSet = value; }
        }


        //method กำหนดกลุ่มของ Column สำหรับข้อมูลจังหวัด
        private void provinceColSet()
        {
            this.Columns.Add("PV_CODE", "รหัสจังหวัด");
            this.Columns.Add("PV_THNAME", "ชื่อจังหวัดภาษาไทย");
            this.Columns.Add("PV_ENNAME", "ชื่อจังหวัดภาษาอังกฤษ");
            this.Columns.Add("PV_ZONE", "ภาค");
            this.Columns.Add("PV_POSTCODE", "รหัสไปรษณีย์");
        }
    
        //method กำหนดกลุ่มของ Column สำหรับข้อมูลสินค้า
        private void productColSet()
        {
            this.Columns.Add("PD_CODE", "รหัสสินค้า");
            this.Columns.Add("PD_NAME", "ชื่อสินค้า");
            this.Columns.Add("PD_UNIT", "หน่วย");
            this.Columns.Add("PD_PRICEUNIT", "ราคาต่อหน่วย");
        }


        //method กำหนดกลุ่มของ Column สำหรับข้อมูลพนักงาน
        private void employeColSet()
        {
            this.Columns.Add("FIRSTNAME", "ชื่อจริง");
            this.Columns.Add("LASTNAME", "นามสกุล");
            this.Columns.Add("AGE", "อายุ");
            this.Columns.Add("SEX", "เพศ");
            this.Columns.Add("POSITION", "ตำแหน่ง");
        }


        //Constructor
        public myGridView()
        {
            InitializeComponent();
        }


        //method ในการวาด Control
        protected override void OnPaint(PaintEventArgs pe)
        {
            //อ้างอิงใช้คุณสมบัติ OnPaint ของ DataGridView คลาสแม่
            base.OnPaint(pe);


            //ตรวจสอบว่ามี Column อยู่แล้วหรือไม่ เพื่อให้ทำการวาดครั้งเดียว เนื่องจาก OnPaint ทำงานแบบลูป
            if (this.ColumnCount < 1)
            {
                //หากมีการเลือกค่ากลุ่ม Column ใดก็ให้วาดโครงสร้างกลุ่ม Column นั้นๆ
                switch (this.selectColSet)
                {
                    case ColumnSet.Employee: this.employeColSet(); break;
                    case ColumnSet.Product: this.productColSet(); break;
                    case ColumnSet.Province: this.provinceColSet(); break;
                }
            }
        }
    }


เสร็จแล้วให้ทำการ Compile และ Build Project จะเห็น myGridView แสดงใน ToolBox

Control myGridView ใน ToolBox
นำ Control myGridView มาวางบนฟอร์มจะปรากฎ Column ตามที่กำหนดใน Property
ในหน้าต่าง Properties ของ myGridView ที่ Property SelectColSet พบชื่อระบุกลุ่ม Column ให้เลือกใช้งานได้อย่างสะดวก
พร้อมแสดงคำอธิบายด้านล่างด้วย

วันศุกร์ที่ 22 กรกฎาคม พ.ศ. 2554

การ Filter ข้อมูลในระดับ DataTable

การ Filter หรือการกรองข้อมูล ส่วนใหญ่แล้วจะสามารถทำได้ง่ายๆภายใน BindingSource แต่ในบางครั้งก็ต้องการใช้งาน Filter ในระดับที่เป็น DataTable เพื่อลดภาระของ Server และเพิ่มความเร็วในการใช้งานข้อมูล รวมถึงอาจนำไปประยุคใช้กับการแสดงรายงาน (Report) ได้อีกด้วย

ผู้เขียนจะแสดงตัวอย่างการเรียกข้อมูลพนักงานขึ้นมาแสดง โดยให้มีการกรองข้อมูลในระดับของ DataTable เลย

สร้าง Project เป็น Windows Forms Application และในฟอร์มวาง Control DataGridView เพื่อใช้แสดงข้อมูล

DataGridView บนฟอร์ม
คำสั่งในการดึงข้อมูลขึ้นมาแสดง ผู้เขียนใส่ไว้ใน Constructor ของฟอร์ม


public partial class Form1 : Form
    {
        //ประกาศ DataSet เป็น member ของคลาส
        private DataSet empDS;


        public Form1()
        {
            InitializeComponent();


            //ดึงข้อมูล EMPLOYEE ผ่าน SqlConnection 
            using (SqlConnection conn = new SqlConnection(Properties.Settings.Default.ICORD2ConnectionString.ToString()))
            {
                this.empDS=new DataSet();
                SqlDataAdapter adap = new SqlDataAdapter("SELECT * FROM EMPLOYEE", conn);
                conn.Open();
                adap.Fill(this.empDS, "EMPLOYEE");


               //แสดงข้อมูลทั้งหมดผ่าน DataGridView
               this.dataGridView1.DataSource = new BindingSource(this.empDS, "EMPLOYEE");
            }
        }
    }


ข้อมูลที่ได้คือข้อมูลทั้งหมดของพนักงาน

ภายใน DataGridView แสดงข้อมูลทั้งหมด
ผู้เขียนปรับปรุงเพิ่มเติม คำสั่งให้สามารถกรองข้อมูลได้โดย DataTable


public partial class Form1 : Form
    {
        //ประกาศ DataSet เป็น member ของคลาส
        private DataSet empDS;


        public Form1()
        {
            InitializeComponent();


            //ดึงข้อมูล EMPLOYEE ผ่าน SqlConnection 
            using (SqlConnection conn = new SqlConnection(Properties.Settings.Default.ICORD2ConnectionString.ToString()))
            {
                this.empDS=new DataSet();
                SqlDataAdapter adap = new SqlDataAdapter("SELECT * FROM EMPLOYEE", conn);
                conn.Open();
                adap.Fill(this.empDS, "EMPLOYEE");


                //ตรวจสอบว่า DataSet มีค่าหรือไม่
                if (this.empDS != null)
                {
                    //ดึง DataTable ออกมาใช้งาน
                    DataTable tb = this.empDS.Tables["EMPLOYEE"];
                    //ใช้ method Select ของ DataTable เพื่อกรองข้อมูลเฉพาะรหัสพนักงาน 1447
                    //จะได้ค่ากลับมาเป็นชุดของ DataRow Array
                    DataRow[] dr = tb.Select("(EMP_COD = '1447')");


                    //ทำการล้าง DataTable ของ DataSet เดิมออก
                    this.empDS.Tables.Clear();


                    //ประกาศ DataTable ขึ้นมาใช้งานใหม่ โดยให้ลอกโครงสร้างจาก DataTable EMPLOYEE เดิม
                    DataTable tb2 = tb.Clone();
                    //ลูปใส่ DaraRow ทั้งหมดที่กรองได้
                    foreach (DataRow row in dr)
                    {
                        tb2.ImportRow(row);
                    }


                    //เพิ่ม DataTable ใหม่ที่กรองข้อมูลแล้ว เข้าไปที่ DataSet ตัวเดิม
                    this.empDS.Tables.Add(tb2);


                    //แสดงข้อมูลทั้งหมดผ่าน DataGridView
                    this.dataGridView1.DataSource = new BindingSource(this.empDS, "EMPLOYEE");
                }
            }
        }
    }


ผลของข้อมูลที่ได้จะเป็นข้อมูลที่ถูกกรองแล้ว

กรองข้อมูลรหัส 1447 พบเพียง Row เดียว
ประโยชน์จากการกรองข้อมูลของ DataTable คือ ในบางกรณีเราอาจจะต้องการกลุ่มข้อมูลของ DataTable หลายๆกลุ่มเพื่อนำไปใช้งานในแต่ละที่ จะทำให้ไม่ต้องเรียกดึงข้อมูลมาใหม่ ทำให้การทำงานของโปรแกรมฝั่ง Client รวดเร็วขึ้น ในขณะเดียวกันก็ไม่ต้องมีภาระการเรียกข้อมูลเดิมซ้ำๆ ไปที่ Server ด้วย

เริ่มต้นสร้าง Custom Control ใน .Net C# ตอนที่ 1

ในการพัฒนาโปรแกรม อาจจะพบความยุ่งยากซับซ้อน เมื่อมีทีมร่วมทำงานกันหลายคน แน่นอนว่าต้องมีการขุด OOP ขึ้นมาใช้อย่างถึงแก่น ไม่ว่าจะเป็น Override, Overload , Inheritance และอีกมากมาย แต่การพัฒนาแบบ OOP ก็ไม่ได้มีแต่การเขียนในรูปแบบ Class Libraly อย่างเดียว บางอย่างหากเราจับมาเขียนเป็น Control จะสะดวกกับการใช้งานมากกว่า ผู้เขียนจะแสดงตัวอย่างการสร้าง Control ด้วย Visual Studio 2010 (.Net 4.0)

สร้าง Custom Control ที่สืบทอดจาก Button
ผู้เขียนสร้าง Project เป็น Windows Forms Application ขึ้นมาแล้วทำการเพิ่มไฟล์ Custom Control เข้าใน Solution Explorer

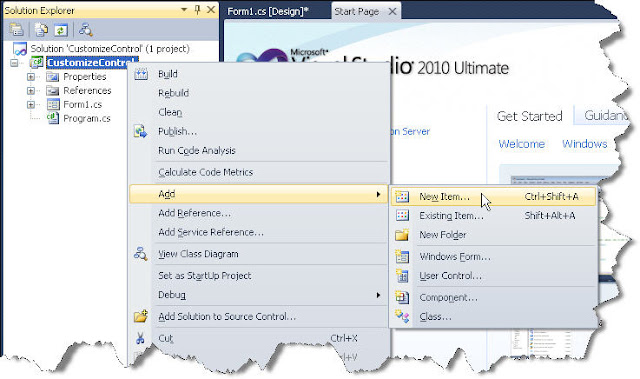
คลิ๊กเมาส์ขวาที่ Project เลือก Add > New Item...
เลือก Custom Control ในที่นี้ผู้เขียนตั้งชื่อเป็น myButton
Class เริ่มต้นที่ Visual Studio สร้างขึ้น

คลาสที่สร้างให้เมื่อเพิ่มไฟล์ Custom Control จะเป็นคลาสที่สืบทอด (Inheritance) มาจากคลาสพื้นฐานของคือคลาส Control หากเราต้องการจะสร้าง Control ใหม่ขึ้นมาก็สามารถ Implement ได้เลย แต่ในที่นี้ผู้เขียนไม่ต้องการสร้าง Control ใหม่ แต่ต้องการนำ Control เดิมมาเพิ่มเติมความสามารถ ผู้เขียนจึงเปลี่ยนในส่วนของการสืบทอด แทนที่จะสืบทอดมาจาก Control ก็เปลี่ยนเป็นให้สืบทอดจาก Button


    public partial class myButton : Button
    {
        //method Constructor
        public myButton()
        {
            InitializeComponent();
        }


        //method ในการวาด Control ที่ทำการ Override เพิ่มเติม แต่ยังใช้ความสามารถของ base class ด้วย
        protected override void OnPaint(PaintEventArgs pe)
        {
            base.OnPaint(pe);
        }
    }


ผู้เขียนจะทำให้ myButton เป็นปุ่มที่เหมือนมีไฟติดเวลานำเมาส์ไปวาง
ในที่นี้ผู้เขียนอยากแนะนำให้เน้นความสำคัญไปที่ method OnPaint ซึ่งจะทำงานอยู่ตลอดเวลาในโปรแกรมแบบ GUI

คำสั่งในการทำงานทั้งหมด


    public enum isEvent { move, none }  //สร้างชนิดข้อมูลเพื่ออ้างอิงสถานะ
    public partial class myButton : Button
    {
        private isEvent IE = isEvent.none;  //ตัวแปรเก็บค่าสถานะ
        public myButton()
        {
            InitializeComponent();
        }


        //ปรับปรุงความสามารถการวาดที่สืบทอดมา
        protected override void OnPaint(PaintEventArgs pe)
        {
            base.OnPaint(pe);  //สืบทอดรูปแบบจากคลาสแม่
            this.RePaint(pe);  //method ในการระบายสี เมื่อสถานะปุ่มเปลี่ยนไป
        }


        //ปรับปรุงความสามารถของ Event เมื่อนำเมาส์เคลื่อนออกจากปุ่ม
        protected override void OnMouseLeave(EventArgs e)
        {
            this.IE = isEvent.none; //กำหนดให้สถานะเป็น none
            base.OnMouseLeave(e); //สืบทอดความสามารถเดิม
        }


        //ปรับปรุงความสามารถของ Event เมื่อเคลื่อนเมาส์บนปุ่ม
        protected override void OnMouseMove(MouseEventArgs mevent)
        {
            this.IE = isEvent.move; //กำหนดให้สถานะเป็น move
            base.OnMouseMove(mevent);  //สืบทอดความสามารถเดิม
        }


        //เปลี่ยนค่าสีตามสถานะ
        private void setGradientColor(PaintEventArgs e)
        {
            Color? c1 = null;
            Color? c2 = null;


            //ตรวจสอบสถานะและเก็บค่าสี 
            switch (this.IE)
            {
                case isEvent.move:
                    c1 = Color.FromArgb(130, Color.Yellow);
                    c2 = Color.FromArgb(70, Color.Black);
                    break;
                default:
                    c1 = Color.FromArgb(50, Color.White);
                    c2 = Color.FromArgb(100, Color.Black);
                    break;
            }


            //วาดสี่เหลี่ยมและระบายสีเป็นแบบ Gradient
            Brush b = new System.Drawing.Drawing2D.LinearGradientBrush(ClientRectangle, (Color)c1, (Color)c2, 90);
            e.Graphics.FillRectangle(b, this.ClientRectangle);
            b.Dispose();
        }


        //วาดรูปแบบที่ต้องการ
        private void RePaint(PaintEventArgs e)
        {
            this.Cursor = Cursors.Hand;  //ให้ปุ่มมีเคอเซอร์เป็นรูปมือเสมอ
            this.setGradientColor(e);  //วาดและระบายสีลงไปที่ปุ่ม


            //ปรับเปลี่ยนรูปแบบตัวอักษรตามสถานะ
            switch (this.IE)
            {
                case isEvent.move:
                    this.ForeColor = Color.Black;
                    this.Font = new Font(this.Font.FontFamily, 12, FontStyle.Bold);
                    break;
                default:
                    this.ForeColor = Color.Black;
                    this.Font = new Font(this.Font.FontFamily, (float)9.5, FontStyle.Regular);
                    break;
            }
        }
    }


เป็นอันเสร็จสิ้นกับการสร้าง Control ให้ Compile และ Build ได้เลย จะพบว่าใน ToolBox จะปรากฎ Control ใหม่ขึ้นมา

Control "myButton"
ทดสอบโดยการลากมาวาง เหมือนปุ่มทั่วไป แล้วรันโปรแกรม

ลักษณะปุ่มเมื่อเปิดโปรแกรม
เมื่อนำเมาส์วางบนปุ่ม จะมีสีเหมือนปุ่มไฟ

วันพฤหัสบดีที่ 21 กรกฎาคม พ.ศ. 2554

[T-SQL] รูปแบบคำสั่งต่างๆ

การ Reset ค่า Field ที่เป็น AutoIncreament Number

รูปแบบ
DBCC CHECKIDENT ([ชื่อ Table], RESEED, ค่าเริ่มต้น)


ตัวอย่าง
DBCC CHECKIDENT (CUSTOMER, RESEED, 1)


วันศุกร์ที่ 15 กรกฎาคม พ.ศ. 2554

Delphi กับการสร้างและใช้งานไฟล์ DLL (Dynamic Link Library)

การใช้ไฟล์ .dll หรือ Dynamic Linke Library ในระบบปฏิบัติการ Windows ดูเหมือนจะเป็นเรื่องที่หลีกเลี่ยงไม่ได้ หากต้องการให้โปรแกรมที่พัฒนาขึ้นมีความยืดหยุ่น และมีประสิทธิภาพมากที่สุด
ไฟล์ DLL นั้นในจุดประสงค์การใช้งานแล้ว ไม่ต่างจากการสร้าง Library ในการพัฒนาโปรแกรม แต่จะแตกต่างกันในรูปแบบของการใช้งาน เพราะ DLL เป็น Library ที่มีการทำให้เป็นภาษาเครื่องแล้ว และให้โปรแกรมอื่นๆสามารถเรียกใช้งานได้ เป็นการเรียกใช้ Library จากภายนอก

การเรียกใช้ DLL จาก Apllication
การพัฒนา DLL ขึ้นมาใช้งานสามารถใช้ภาษาใดในการพัฒนาก็ได้ เพราะอย่างไรก็ตามก็ต้อง Build ไปเป็นภาษาเครื่องอยู่ดี แต่อาจจะมี Type บางอย่างที่อาจคลาดเคลื่อนไปได้ อย่างเช่น หากพัฒนา DLL ด้วย Delphi การรับ - ส่งค่าตัวอักษร แทนที่จะใช้ String ก็จะต้องเปลี่ยนเป็น WideString แทน

ตัวอย่างการสร้างไฟล์ DLL ผู้เขียนจะใช้ไฟล์ DLL ในการเปิด และบันทึก Text File โดยการเรียกใช้จากโปรแกรมอื่น

สร้างไฟล์ Dynamic Link Library (.dll)
ผู้เขียนจะสร้างไฟล์ DLL จาก Delphi XE โดยการเลือกสร้าง Project เป็น Dynamic-link Library

จากนั้นผู้เขียนจะบันทึก Project เป็น myDLL

เมื่อบันทึกแล้วจะพบว่าชื่อ Project เปลี่ยนเป็น myDLL.dll
ส่วนของคำสั่งทั้งหมดของ DLL ผู้เขียนได้สร้าง 2 method คือ OpenFile และ SaveFile


library myDLL;


uses
  SysUtils,
  Dialogs,
  Classes;


{$R *.res}
    // method เปิดไฟล์ เมื่อเปิด Text File แล้วจะคืนค่า กลับไปเป็น WideString
    function OpenFile: WideString; stdcall;
    Var
       openDlg: TOpenDialog;
       fileText: TStringList;
    Begin
       try
         openDlg:=TOpenDialog.Create(nil);
         openDlg.Filter:='Text File|*.txt';
         fileText:=TStringList.Create;


         if openDlg.Execute then
           Begin
             if openDlg.FileName<>'' then
                //load Text ในไฟล์มาเก็บไว้ใน TStringList
                fileText.LoadFromFile(openDlg.FileName);
           End;
         Result:=fileText.Text;  //ส่ง WideString ออกไปจาก method
       finally
         FreeAndNil(openDlg);
         FreeAndNil(fileText);
       end;
    end;


    //method บันทึกไฟล์ ค่าที่ส่งเข้ามาคือชุดข้อความที่จะบันทึก
    procedure SaveFile(Value : WideString); export;
    Var
        saveDlg: TSaveDialog;
        fileSave: TStringList;
    begin
        try
           saveDlg:=TSaveDialog.Create(nil);
           fileSave:=TStringList.Create;
           if saveDlg.Execute then
             Begin
                 if saveDlg.FileName<>'' then
                   Begin
                     //นำ TStringList เข้ามาเก็บชุดข้อความที่ส่งเข้ามา
                     fileSave.Text:=Value;
                     //ให้ TStringList บันทึกลงไฟล์
                     fileSave.SaveToFile(saveDlg.FileName);
                   End;
             End;
        finally
           FreeAndNil(saveDlg);
           FreeAndNil(fileSave);
        end;
    end;


    //ประกาศชื่อ method ของ DLL
    exports OpenFile,SaveFile;


begin
end.


จากนั้นให้ Compile และ Build  Project จะเกิดไฟล์ myDLL.dll ขึ้นมา


การใช้งานไฟล์ Dynamic Link Library (.dll)
ผู้เขียนใช้ Delphi 7 ในการสร้างส่วนเรียกใช้งาน DLL โดยออกแบบฟอร์มตามภาพด้านล่างนี้

ประกอบด้วย TMainMenu และ TRichEdit
จากนั้นให้ประกาศ method โดยอ้างอิงไปที่ไฟล์ .dll โดยมีรูปแบบดังนี้

  • function ชื่อ method : ค่าที่ส่งกลับมา ;external 'Path ที่อยู่ของ DLL File'
  • procedure ชื่อ method(ค่าที่ส่งไป);external 'Path ที่อยู่ของ DLL File'


type
  TForm1 = class(TForm)
    MainMenu1: TMainMenu;
    File1: TMenuItem;
    OpenFile1: TMenuItem;
    SaveFile1: TMenuItem;
    RichEdit1: TRichEdit;
  private
    { Private declarations }
  public
    { Public declarations }
  end;


var
  Form1: TForm1;


  function OpenFile : WideString; stdcall; external 'D:\Project\Delphi\_project test\XEdll\Debug\Win32\myDLL.dll'
  procedure SaveFile(Value: WideString);external 'D:\Project\Delphi\_project test\XEdll\Debug\Win32\myDLL.dll'


คำสั่งเรียกใช้ DLL ผ่านเมนูที่สร้างขึ้น

//Event Click ของ เมนู Open File
procedure TForm1.OpenFile1Click(Sender: TObject);
begin
     Self.RichEdit1.Text:=OpenFile;
end;


//Event Click ของ เมนู Save File
procedure TForm1.SaveFile1Click(Sender: TObject);
begin
    SaveFile(Self.RichEdit1.Text);
end;

เมื่อรันโปรแกรมก็จะสามารถบันทึก และเปิด Text File ได้คล้ายๆกับโปรแกรม notepad

ทดสอบการบันทึกไฟล์ เป็น dllsave.txt
ตรวจสอบไฟล์ที่บันทึก
เปิดไฟล์ที่บันทึกไว้